🎉️ Welcome to the getting started guide for I Haza Website! This website was created using exactly the same tools that you'll be learning to use here. There's also a starter project if you want an existing set of files to start from, just download it and import it into your own account.
You can use I Haza Website however you like. It can be used for writing notes, creating web pages and storing media. Everything you add or import is synchronised between your devices, so it's also great for transferring files.
If you want to get organised, you can create separate projects and folders within each project. You also have a media library so that files can be shared between your projects. You can add images, videos, fonts, pdfs and other file types. These files can also be organised into folders, the same way that you organise your projects.
🔒️ Projects and media library files are all private and encrypted locally. No one else has access to them - they're only readable when you're logged in to your own account. The only time they're unencrypted is when you publish a project to a website, which makes it publicly available.
Create an account
Haven't logged in yet? Go to the sign up page and fill in your details. You'll be sent an email with a validation link, make sure you validate your email in case you ever need to reset your password. You will also need to validate your account before you can publish anything. Check your spam folder if you don't see the email after signing up. 👀️
Create a project
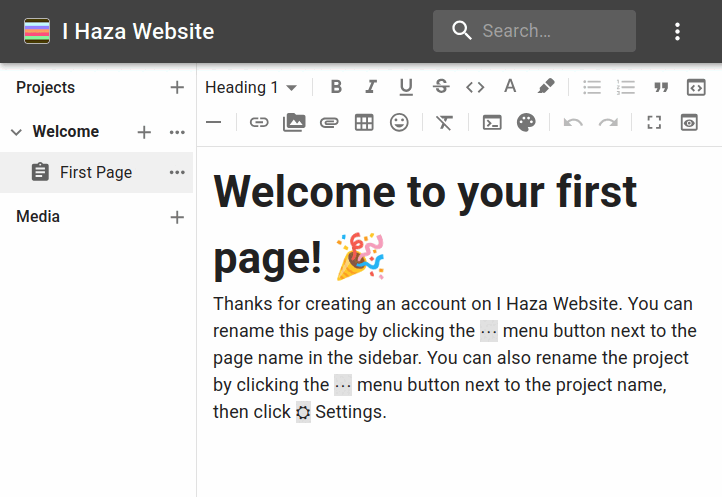 Your account is created with a default project. Click the
⋯ actions menu next to the project name to rename it, or click the + Projects menu at the top of the sidebar and then New Project. It will create the project in the sidebar and prompt you to fill in the name. The sidebar can be toggled by clicking the  icon on the left of the control bar, it also slides to open on mobile.
Once a project has been created you will then be asked for the name of the first file in that project. You can name files whatever you like, however some filename extensions have special meanings within a project. Whatever names you give them, files only ever reference other files within a project. You can create folders inside a project that contain other files, then folder names will be used as paths in urls when publishing a project. When you're ready to publish, the website you create will contain everything you've added within a project. Files and folders can be moved between projects if you don't want them included when publishing.
Write
Select a file within a project to display it in the editor. Most files will display the full editor toolbar, however some filename extensions are reserved for publishing and display as plain text. Every change is stored as you make them, there are no save buttons in the app. Sign in on more than one device and they all stay up to date automatically.
You can create new files by clicking the + icon next to the project name and then click New File in the menu. Use the toolbar for formatting and adding images, videos and other files from your media library. See the help on writing page for details on the toolbar.
Media library
Add images, video, fonts and other files using the sidebar's media library. You can organize files into folders however suits you, see Media library for more details. Images and videos imported here can be added to any page via the editor's toolbar.
Preview your pages
Click Preview in the editor toolbar at any time to see a page rendered as it would appear when published. A page can be published without using templates, but if you create a template in a project then it will be used when rendering the page's content. This allows you to focus on the content of the page when writing, rather than the structure. See [Templates & page design] if you'd like to learn more.
Publish a project
To publish a project first make sure you have a page called index or index.html, as this will be the home page displayed for your website. Without one you will see a warning when publishing or exporting.
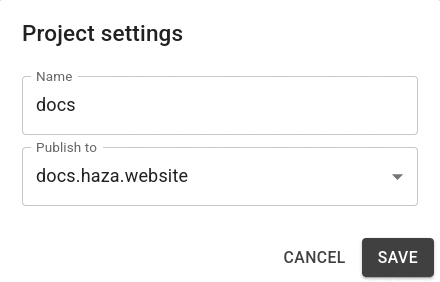 When you're ready to publish a project, go to the Settings page from the account menu in the top right corner and pick a domain name. By default accounts can have one domain to publish to, but you can remove it and request a new name if you want to change it.
See Publishing your site for more information.
Once you have a domain name, go back to your project, click the ⋯ menu and open its ⛭ Settings. A dialog will open, set Publish to to the domain you just created. The dialog Save button will switch to Publish so you can publish your website!
Once published, there will be two new options in your project's menu: Publish and Visit. Click Publish whenever you've made changes that you want to go live. A clock icon will appear next to a published project whenever you've made updates that haven't been published yet. Hover over it to see the last published time. The Visit menu option will take you to your new website.
Where to go next
Writing pages - the full editor toolbar: tables, code blocks, embedded video, emoji and more.
Organising your site - folders, templates, CSS pages, and finding things with search.
Media library - uploading and managing images, video and fonts.
Publishing your site - domains, limits, and how publishing actually works.
Templates & page design - for full control over your published pages' HTML and styling.
Plugins - built-in interactive behaviors: a lightbox for images, a light and dark mode toggle, copy buttons and more.
Importing & Exporting - download your whole project as a real, self-contained folder, or bring in pages you already have.
Accounts & storage - storage limits, upgrading, and signing in on more than one device.