Organising your site
All files that are edited within the application are created inside projects. These are self-contained spaces for files, folders and templates. You can have as many projects as you like, when you're ready to publish your work a project becomes it's own website.
Projects
Click the + button to the left of Projects at the top of the sidebar and then select New Project from the menu to create one. To the right of the new project name you will see the ⋯ actions menu, which includes a ⛭ Settings option. This opens a dialog where you can rename and publish a project, see Publishing your site). The actions menu also allows you to Export a project to download a copy, see see Importing & Exporting for more information. Finally there's also a delete option.
Pages, folders and templates
Use the + menu next to the name of the project to add files and folders.
New File - creates a file and allows you to enter a name for it. The toolbar mode displayed for a file depends on the filename extension. Use
.cssfor style-sheets,.liquidfor templates, or.txtfor plain text files, otherwise any other extension or no extension will use the full editor toolbar. See Writing pages for more details.New Folder - creates a folder and allows you to enter a name for it. Folders help you group pages, templates and other folders together, and can be expanded or collapsed in the sidebar. When publishing a website the folder names will appear as paths in the address bar. You can also reference files from other folders within a single project by using folder names.
Templates
Create templates to render your page content without needing to repeat the same structure for each page. I Haza Website supports Liquid template syntax, so create files with a .liquid extension to create a new template. See Templates & page design for help with template syntax.
The first template you create in a project becomes the default, you can view the rendered output using the Preview button in the toolbar. You don't need templates to publish and preview files, but once you add them to a project the syntax needs to be correct. Clicking publish or preview will alert you to any issues in the template.
Once you've created more than one template in a project the first one created will be set as the default. You can change the default and also specify a template per page if you don't want a particular page to use the default. The same rules apply per folder, however if you don't create a template in a folder it will fall back to any templates in the folders above it.
Other file types
Other plain text file types can be created by giving them .css and .txt extensions. They are both published as plain files when creating a website, CSS files are displayed using syntax highlighting in the editor.
Renaming, moving and deleting
Every page, folder and template has its own ⋯ actions menu allowing you to Rename, Move and Delete files and folders. Move opens a dialog for picking somewhere to move the file or folder, start typing and an autocomplete list of projects and folders will be displayed for destinations.
Templates also display a ✓ Set Default action once a folder has more than one template available. The current default template is displayed with a ✓ next to it. Content pages display which template they're using once there is more than just the default too. The template name is shown as a menu option, click it so see the list of templates you can use for the page or set it back to the current default in a folder or project.
Finding things
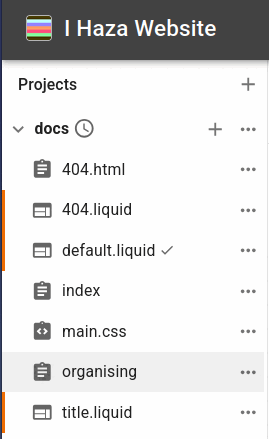 Use the search bar at the top of the app to jump to a file or folder by name. An exact match on a page or template opens it directly, an exact match on a folder expands it. Search only looks through what is currently expanded in the sidebar and highlights multiple results with an orange margin.
A highlight is shown to the left of matching filenames in the sidebar. Any part of the filename or folder will match, in this example the extension liquid was the search term which matched multiple files.