Importing a project
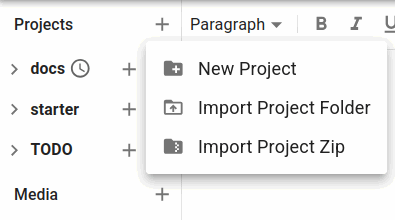 You can import an existing project into I Haza Website, either from a folder or a zip file. Both import methods will retain your existing folder names and structure. Click the
+ button next to Projects to see the import options.
Each file is imported based on it's extension, unrecognized files are skipped during import. A new project is created with the name of the folder or zip file selected.
File extensions
Here is the list of file types that you can edit within the app:
Pages:
.md,.markdown,.html,.htm- converted to rich textTemplates:
.liquid- imported as plain text with HTML syntax highlighting, since they are Liquid tags embedded in HTML.CSS:
.css- imported as plain text with CSS syntax highlighting.Plain text:
.txt- imported as plain text with no syntax highlighting.
These files are imported into your media library, into a folder named after your project:
Images:
.png,.jpg,.jpeg,.gif,.svg,.webp,.avif,.icoFonts:
.woff,.woff2,.ttf,.otfVideo:
.mp4,.webm,.mov,.ogvPDF:
.pdf
Note that .zip files inside your import are expanded in place rather than added as a media item. You can add them via your media library's own Add File if you don't want it expanded.
Path rewriting
Import does a one-time best effort to update the paths your files use, so they continue working once brought into the app:
.md,.markdownand.htmfilename extensions are renamed.htmlAn image reference, for example an
<img>tag or markdownpointing at another file in the same import is re-linked to that image directly.A link between two pages in the same import, for example
[text](other.md)is rewritten to that page's path.A CSS file's own
url(...)references are rewritten the same way.
A link or reference to something outside the import, or an absolute URL, is left as it is. This rewriting only happens once, at import time, so check your links and images after importing. Previewing your pages will also show any warnings for paths that don't match.
Front matter
A page can start with a block of front matter between --- lines, it's currently used to create posts. Once read it's taken out of the page's content, and the following values are used:
---
title: Hello world
date: 2026-11-04
draft: false
tags: [news, local]
---title- added as a heading at the top of the page, if the page doesn't already have one.date- a folder containing pages with adatebecomes a posts folder, and each of them becomes a post published on that date. The folder's style comes from how its pages are laid out: in year, month and day folders, in year and month folders, with names starting with the date (like2026-11-04-hello-world.md), or with names alone. Pages at the top level of the import stay ordinary pages, since a project can't be a posts folder itself.draft-trueimports a post as a draft, which isn't published until it's given a date with Set Published. Pages in a posts folder without adateare imported as drafts too.tags- kept with each post, ready for templates to use in a later update.
Exporting a project
You can export a project from the project's menu, it will render every page in the project and create a .zip file. It then downloads the project as a self-contained website, ready to view or publish elsewhere if you prefer!
Export also shows rendering warnings, the same as Publish and Preview. Export will only show an error if there are no content pages at all.
Viewing an export
Once you've unzipped the downloaded file, you can view your project using a local web server. The easiest way to do this is via the serve command, which is available from Node.js. Install that first and then run:
npx serve unzipped-folder-namenpx runs a tool without a separate install step, downloading it temporarily the first time you use it. This prints a http://localhost:... address which you can open in your browser to see your exported site. If your project has no index page yet the serve command shows a plain directory listing instead, which gives you access to your other pages.