Create a blog
You can create your own blog using I Haza Website, either as your home page or at a path on your website. A blog is a folder of posts, each stored with the date it was published.
This page walks through setting up a blog, from an empty project to a published website. A feed is also created when you publish, allowing readers to subscribe in any feed reader.
Make a posts folder
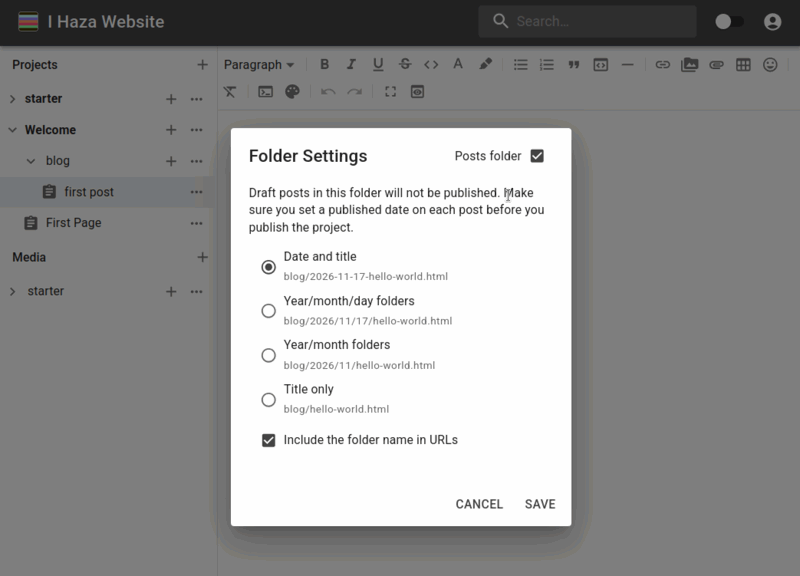 Create a folder for your posts in a project. Open its
⋯ actions menu and choose Settings, then tick Posts folder. Choose how your posts are named and filed when they're published:
Date and title - every post is named with its date, such as
2026-11-04-hello.html.Year/month folders - posts are filed into folders for the year and month, such as
2026/11/hello.html.Year/month/day folders - the same but with a folder for the day too.
Title only - posts are named with just their title, such as
hello.html.
You can change the style later, and your posts are moved to match the chosen folder structure.
Untick Include the folder name in URLs if you prefer to have your blog as your home page. Posts remain in the named folder but are published at your site's top level rather than inside the folder's own path. With it ticked, a post is published at an address such as /posts/2026/11/hello.html.
A posts folder can be created inside another folder, but it can't have folders of its own, apart from the date folders it makes for you. A project can have more than one posts folder, but not two side by side in the same folder, and not one inside another. Turning a folder that already has pages into a posts folder makes those pages drafts, ready for you to publish.
Write and publish posts
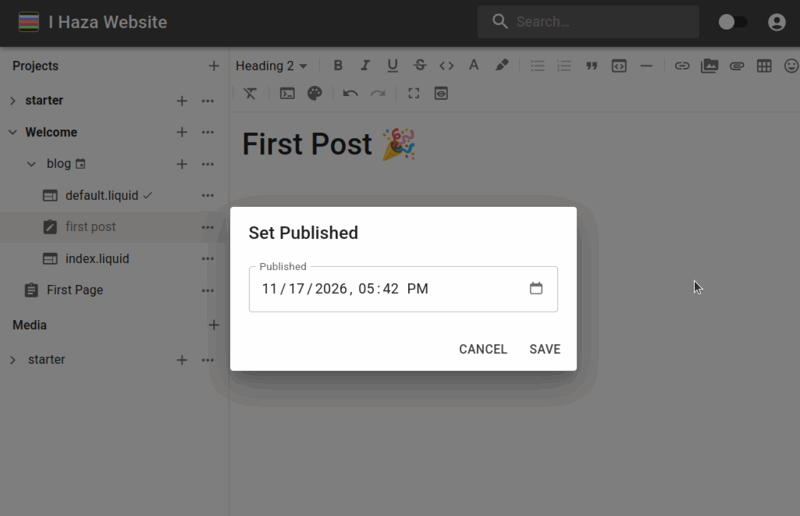 Click the plus icon next to your posts folder and choose New File to start a post. A new post is a draft, shown dimmed with a draft icon in the sidebar. Drafts are never published, so you can take your time with them, and you can preview them like any other page.
When a post is ready, open its ⋯ actions menu and choose Set Published, then pick its date and time. The post is filed by its date, ready for the next time you publish the project. Hover over a post to see when it was published. Choose Set Draft from the same menu to take a post back out of your blog next time you publish the project.
If another page links to a draft, publishing will warn you, since that link won't work until the post is published.
Templates, CSS and text files can live in a posts folder too. Renaming a post with a .liquid, .css or .txt extension turns it into that file type, and also moves it out of its date folder to the top of the posts folder. Renaming one of these files back to a page name makes it a draft post.
Give posts a layout
Posts use templates the same way other pages do, see Templates & page design. A post's template also has access to a post's published date, and the older and newer posts on either side of it, so it can show the date and link between posts:
{{ content }}
{% if page.published %}
<p>{{ page.published | date: "%-d %B %Y" }}</p>
<nav>
  {% if page.previous %}<a href="{{ page.previous.url }}">{{ page.previous.title }}</a>{% endif %}
  {% if page.next %}<a href="{{ page.next.url }}">{{ page.next.title }}</a>{% endif %}
</nav>
{% endif %}
page.published is only set for a published post, so other pages using the same template leave this part out.
Add a home page that lists your posts
A template can create your home page and pages for older posts after it, without needing a specific content page of its own. Create a template such as index.liquid and add a pager to the front matter at the top:
---
pager:
  size: 5
  format: page-{n}
  index: true
---
{% for post in pager.posts %}
<article>
  {{ post.content }}
  <a href="{{ post.url }}">{{ post.published | date: "%-d %B %Y" }}</a>
</article>
{% endfor %}
{% if pager.previous %}<a href="{{ pager.previous }}">Older posts</a>{% endif %}
{% if pager.next %}<a href="{{ pager.next }}">Newer posts</a>{% endif %}
This publishes your home page, index.html, with your 5 newest posts, then page-2.html, page-3.html and so on for older ones, adding pages as you write more posts. To see them, open the template and click Preview, then follow the links between pages. See Pager for all the options.
To list a few posts on a page you write yourself instead, use site.posts, such as {% for post in site.posts.posts limit:3 %} for a posts folder named posts. See Site info.
Your feed
Once your project has a domain, publishing writes a feed for your posts folder, named feed.xml, with your 20 newest posts in full. Add a link to it in your template's <head> so feed readers can find it from your site's address:
{% if site.feeds.posts %}
<link rel="alternate" type="application/rss+xml" title="{{ site.feeds.posts.title }}" href="{{ site.feeds.posts.url }}" />
{% endif %}
Use your posts folder's name in place of posts.
Instant updates
Feed readers usually poll your feed for new posts. Readers that support WebSub or rssCloud can be told about new posts as soon as you publish them instead. Your feed already includes everything they need, and adding the hub to your template's <head> lets readers that follow your home page itself use it too:
{% if site.hub %}<link rel="hub" href="{{ site.hub }}" />{% endif %}Tip: microformats
Some readers can follow a page directly, rather than a feed, by reading the microformats in it. Adding a few classes to your templates lets them find each post's title, date and content:
<div class="h-feed">
  {% for post in pager.posts %}
  <article class="h-entry">
    <data class="p-name" value="{{ post.title }}" hidden></data>
    <a class="u-url" href="{{ post.url }}">
      <time class="dt-published" datetime="{{ post.published | date: "%Y-%m-%dT%H:%M:%S%z" }}">{{ post.published | date: "%-d %B %Y" }}</time>
    </a>
    <div class="e-content">{{ post.content }}</div>
  </article>
  {% endfor %}
</div>
These classes are only for readers, so use classes of your own for styling.
Bring an existing blog
You can import posts you already have, see Importing a project. Import reads the title and date from each post's front matter, and a folder of posts with dates becomes a posts folder. Its style matches how the posts are named: with a date at the start, such as 2026-11-04-hello.md, or in year and month folders.
To bring posts across from a website, mf2-crawl saves a site's posts as files with front matter, along with their images and video, ready to import. As the name suggests, it works with sites that mark up their posts with microformats. Give it the address of the page listing your posts and a folder to save them in:
npx mf2-crawl https://example.com my-blogThen import the my-blog folder into your account.